Network settings#
Network settings can be found from Settings -> Network settings -> IP-Settings
IP-Settings#
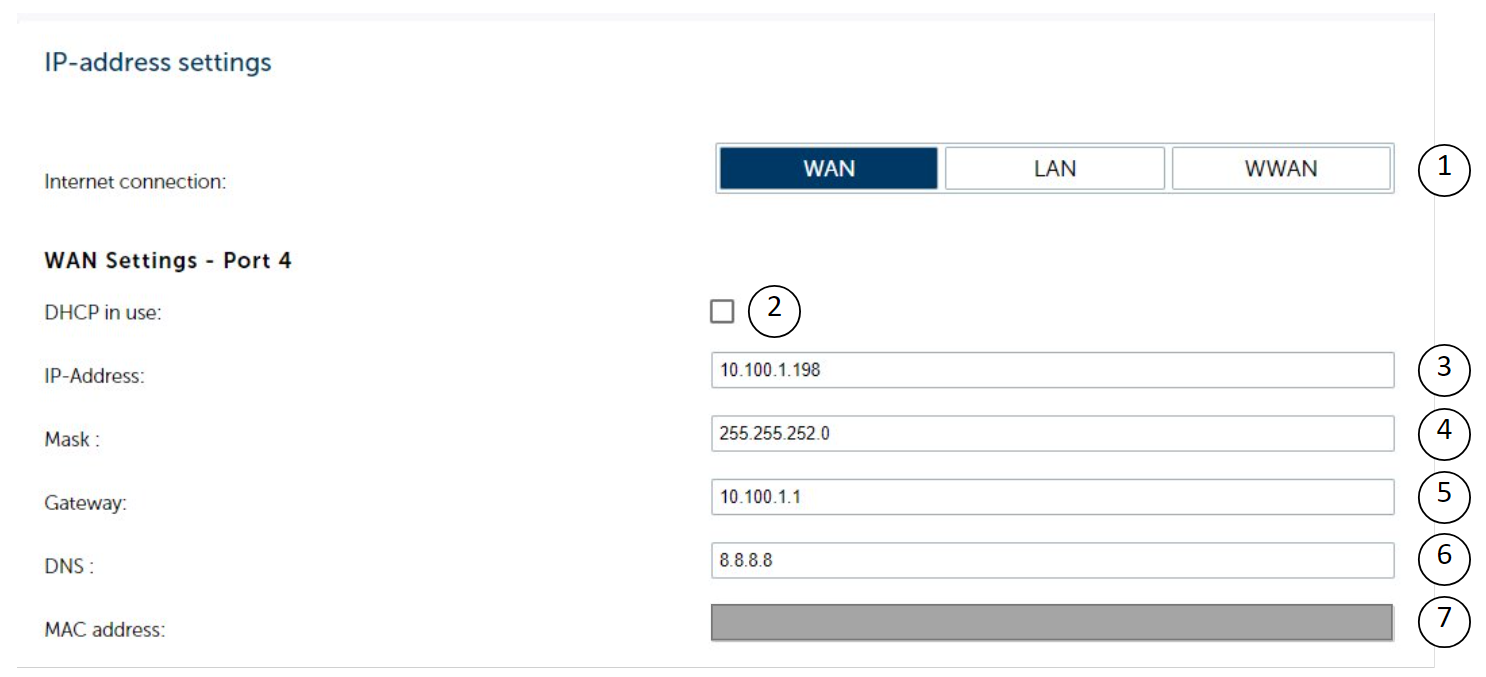
Internet connection and WAN Settings.
WAN-Port is typically used to connect FX-Controller to alerta, tosibox or other networks.

Selecting the source of internet for the controller. WAN = WAN-Port of controller, LAN = LAN-Port of controller and WWAN = USB-Stick on USB1.
DHCP in use. Note! If DHCP is activated, the controllers should be connected to each other through LAN to make global points and stations.DAT work.
IP-Address of WAN-Port.
Netmask for WAN-Port.
Gateway. This allows data to go from one network to another. Note! This only works if the Internet connection is “WAN”.
DNS = Name server. For example. 8.8.8.8 is google name server.
WAN-Port MAC address. Blurred in example picture.
LAN settings#
LAN-Port is typically used to connect devices like other FX-Controller, MultiLINK and 3rd party devices like modbus TCP device to the controller.

IP-Address of LAN-Port.
Gateway. This allows data to go from one network to another. Note! This only works if Internet connection is “LAN”.
Netmask for LAN-Port.
LAN-Port MAC address. Blurred in example picture
WiFi Settings#
WiFi is typically used in the testing phase to have short range remote connection. Visio panel can be also connected to controller with WiFi.

Activate the WIFI.
IP-Address of the WIFI.
Netmask for WIFI.
Name of the WIFI network.
Password for WIFI network.
WIFI MAC address. Blurred in example picture.
Mobile network#
Mobile network (WWAN) settings. Typically used for internet connection over mobile connection.

Activate 3G/4G Mobile network as WWAN.
APN. Check this with your internet provider. Typically, it is “internet”.
PIN code of SIM. Preferably deactivate the PIN code and leave this plank.
IP-Address or URL where the device will ping every 5 minutes. If the ping fails 3 times the controller’s modem is reset by powering off and back on.
Non changeable IP-Address given by SIM.
Remote server and Domain login#

Remote server IP-Address
Non changeable router type.
Domain login in use.
Port settings#
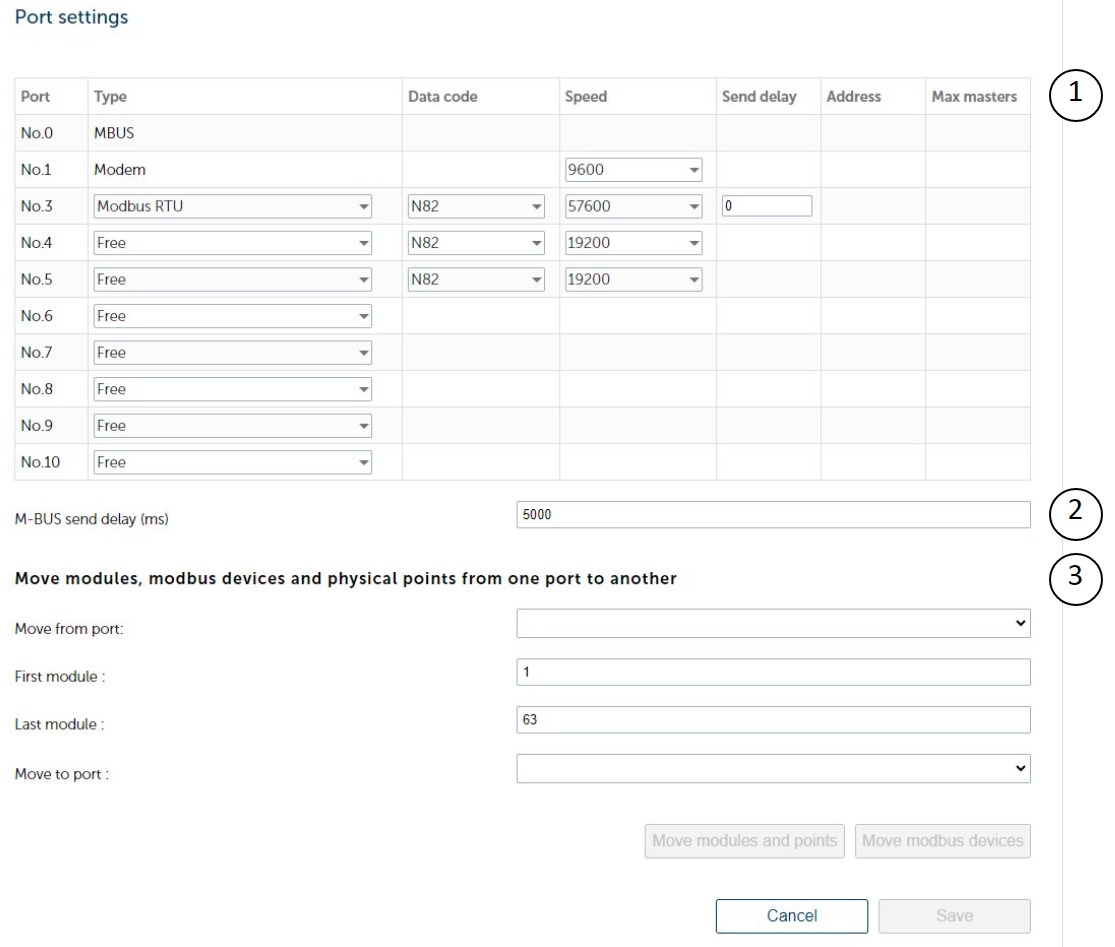
Port settings can be found from Settings -> Network settings -> Port settings. Port settings are needed when connecting modules, multilinks, modbus devices etc to FX-Controller.

FX-3000-X has 10 ports in use.
Port 0 is reserved for MBUS communication.
Port 1 is reserved for GSM Modem used for alarm forwarding by SMS.
Port 2 is hidden, used for internal purposes.
Port 3 is the only port that has a physical interface on the controller’s connection rail. In settings you can select.
Ports 4 and 5 are used with RS-485-C extension card. The ports can be selected as Modbus RTU Client or server.
Ports 6-10 can be used for:
Modbus UDP, which is Modbus RTU device through multilink.
Modbus TCP.
Modbus over TCP is a rare use case modification of Modbus RTU over TCP.
MBUS device through multilink.
M-BUS send delay (ms) is the delay the controller waits before sending a new request after the previous device’s wait time has ended. This setting affects all the M-BUS devices.
With these settings you can move modules and points or devices from one port to another.
Example:
Note
Make sure that the destination port is active.
On port 4 we have modules 1-15. We want to move the modules to port 5. Select these options and click move modules and points.
